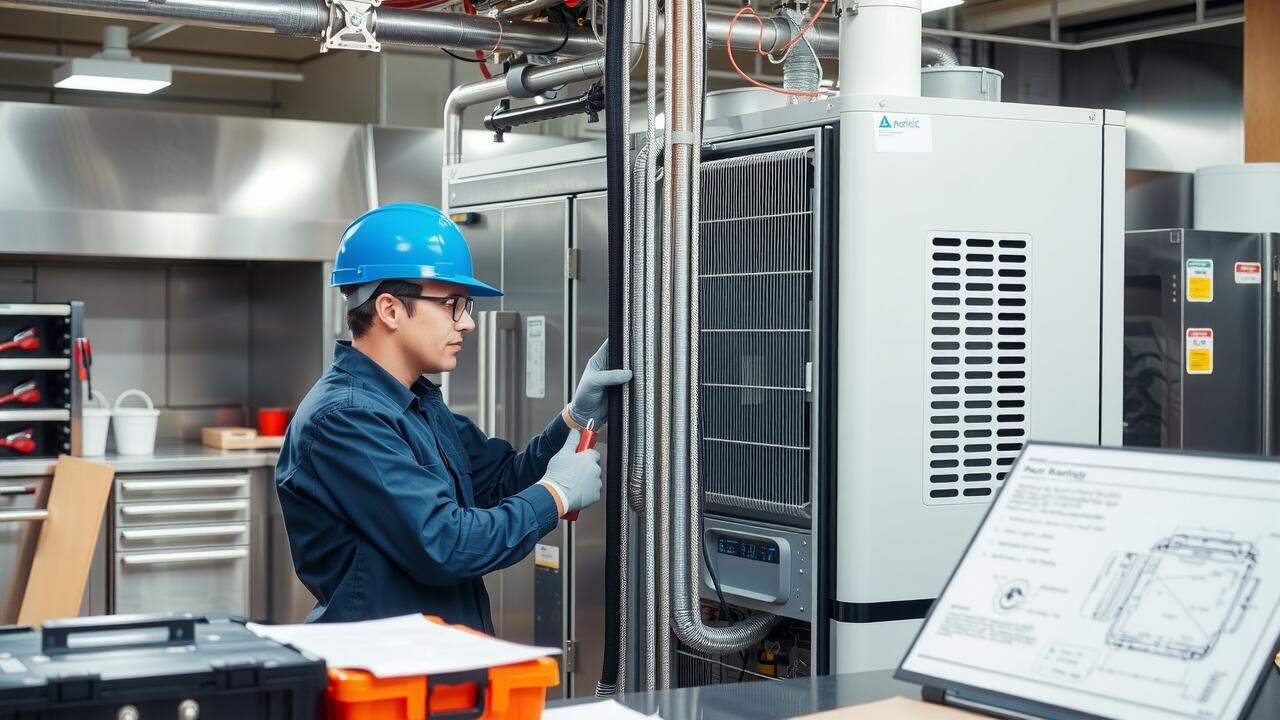
Assessing Refrigerant Levels
Assessing refrigerant levels is a critical step in troubleshooting a refrigeration system. Low refrigerant can lead to inefficient cooling and potential damage to the compressor. Before checking the levels, ensure that the system is properly shut down and isolated. Use a pressure gauge to measure the refrigeration pressure against the manufacturer’s specifications. This information will help determine if the refrigerant is present in sufficient quantities or if a recharge is necessary.
In the realm of refrigeration system installation and repair, understanding the importance of proper refrigerant levels is fundamental. If the refrigerant appears low, it may indicate a leak in the system that requires immediate attention. Identifying and rectifying leaks not only helps maintain optimal performance but also extends the lifespan of the unit. Regular checks and maintenance can prevent issues related to refrigerant levels, ensuring your refrigeration system operates at peak efficiency.
How to Check and Recharge Refrigerant
To check and recharge refrigerant in a refrigeration system, you first need to gather the necessary tools, including a manifold gauge set and a refrigerant canister. Start by connecting the gauge set to the service ports on the system. Ensure that the system is turned off before making any connections. Once connected, turn the system back on and observe the pressure readings on the gauges. This will give you an idea of whether the refrigerant levels are sufficient or if a recharge is necessary.
If the levels are low, you can begin the recharging process. First, locate the appropriate refrigerant for your specific system. Open the valve on the refrigerant canister while monitoring the pressure on the gauges. It is crucial to add refrigerant slowly, allowing the system to adjust to the changes. Excess refrigerant can lead to inefficiencies or even damage the system. Following these steps will ensure that your refrigeration system installation and repair are conducted effectively, maintaining optimal performance and efficiency.
Inspecting the Condenser
Inspecting the condenser is a crucial step in troubleshooting a refrigeration system. A dirty or blocked condenser can hinder the unit’s ability to expel heat, leading to inefficiency or even failure. Begin by visually examining the exterior for any debris, such as dust, leaves, or grease, which can accumulate over time. Clearing away these obstructions will help ensure optimal airflow. Additionally, check for any signs of corrosion or physical damage that could impact performance.
Regular maintenance of the condenser is essential for the longevity of the refrigeration system. Cleaning the condenser coils regularly can significantly improve energy efficiency. Use a soft brush or a cloth to wipe away dirt. In some cases, a gentle spray from a garden hose can help remove stubborn residues. During the inspection, verify that the condenser fan operates smoothly and is free from any obstruction. If issues persist despite these measures, consider consulting a professional for Refrigeration System Installation and Repair to ensure comprehensive care and address underlying problems.
Cleaning and Maintenance Tips
Keeping the condenser clean is vital for the efficiency of a refrigeration system. Dust, dirt, and debris can accumulate on the coils, hindering heat exchange. Regularly inspect the condenser for buildup and clean it when necessary. A soft brush or cloth works well for removing dirt. Ensure that the area around the condenser remains free from obstructions to allow for proper airflow.
Maintaining the evaporator is equally important. Check for frost buildup on the coils, which can indicate airflow issues. Regularly clean the evaporator fan and ensure that the drain pan is clear to prevent water accumulation. Scheduling professional inspections can provide insights into any deeper issues. Many companies offer specialized services in refrigeration system installation and repair, which is beneficial for comprehensive upkeep.
Evaluating the Evaporator
The evaporator plays a crucial role in the refrigeration cycle by absorbing heat from the surrounding environment. When evaluating the evaporator, it’s essential to inspect for any signs of frost buildup, as excessive frost can indicate issues with airflow or refrigerant levels. A dry evaporator can also signal that the refrigerant is low, which impacts the system’s efficiency. Regular checks help in identifying potential problems early, preventing costly repairs later on.
Proper airflow is vital for the evaporator to function effectively. Ensure that the fans are operating correctly and that there are no obstructions blocking airflow. Dirty coils or filters can hinder performance, reducing the system’s overall capacity. For anyone involved in Refrigeration System Installation and Repair, understanding how to evaluate the evaporator is key to maintaining cooling efficiency and prolonging the lifespan of the equipment.
Diagnosing Airflow Problems
Airflow problems in a refrigeration system can lead to inefficient performance and increased energy costs. Begin by checking the air filters, as clogged filters can restrict airflow and cause the system to work harder than necessary. Ensure that the vents and grilles are unobstructed, as blocking these areas can also hinder airflow. If the filters and vents are clean but issues persist, consider examining the blower motor and fan operation to determine if they are functioning correctly.
Another crucial aspect to evaluate is the ductwork for any blockages or leaks. Inspect all connections and joints to ensure there are no gaps where air could escape. Proper insulation is key for maintaining optimal airflow throughout the system. If your troubleshooting efforts do not resolve the issue, it may be wise to consult a professional for thorough evaluation and repairs. Professional assistance is particularly beneficial in complex cases, making Refrigeration System Installation and Repair an advisable option for ensuring long-term efficiency.
FAQS
What are the first steps in troubleshooting a refrigeration system?
The first steps include assessing refrigerant levels, inspecting the condenser and evaporator, and evaluating any airflow problems.
How can I check if my refrigeration system needs more refrigerant?
You can check the refrigerant levels by using a pressure gauge or by observing the performance of the system. If it’s not cooling effectively, it may need a recharge.
What maintenance tips can help keep the condenser clean?
Regularly clean the condenser coils, remove any debris or obstruction, and ensure proper airflow around the unit to maintain efficiency.
What signs indicate that there may be an airflow problem in the evaporator?
Signs of airflow problems include inconsistent cooling, unusual noise from the system, and visible ice buildup on the evaporator coils.
Is troubleshooting a refrigeration system safe to do without professional help?
While some basic troubleshooting tasks can be safely performed by homeowners, more complex issues often require professional assistance to ensure safety and proper repairs.